Do you smell pumpkin spice? ‘Cause we sure do! It’s the best time of year and you’re getting a jam-packed new Neos release. What could be better? We can only think of one thing: the “New in Neos” webinar with Bryan Billig on September 29 1pm ET. Register today.
Features
Enhancements
New Integrations
YoCierge
Alert Communications
Dragon Legal Anywhere
LegalSoft
Improvements & Updates
New Features
Case Tab Migration
Seamlessly transfer data from one record to another, even if the fields in the destination record are different from those in the source record.
As long as mapped fields are of the same field type (e.g., alphabetic to alphabetic, or date to date), even if the fields have a different title, the data will be copied to the destination field when mapped. This powerful feature will copy all mapped fields between all cases of the selected Case Type saving time and effort when updating or migrating data.
Note: Case Tab Migration should only be processed by firm administrators who have the new Special Permission enabled. It is important to proceed with caution and carefully review all proposed changes as the migration cannot be undone.
How to use it
Access the feature through Settings > Miscellaneous (a new special permission titled "Case Tab Migration" must be enabled to access the workflow)
Select a case type - applicable updates will be made to all cases of the selected case type
Select a source tab (flat tabs) - Choose from any flat tab (UT 6-10, Case, or Accident Info) that you want to migrate field data from
Map destination fields - Choose a corresponding field from any other flat tab (other than the selected source tab) that you want to copy the field data to
Grid displays all source fields from the selected source tab with destination field with example data from the most recently created cases of the selected Case type
You can select "Show more" to display 5 more rows of example case data
The destination field must match the "type" of the Source field in order to map it (e.g., a "Yes/No" field cannot be mapped to a date field) - an Invalid Field Type message will appear, letting you know what the field types are
Customize fields dropdown - This allows you to select which source fields you would like to see in the mapping grid below.
Review migration - Once you map all of the fields you want to migrate, proceed to the review migration modal. This displays a count of the total number of fields mapped and shows what changes will be made in 5 of the most recently created cases of the selected case type
Shows the source field, new tab and field being migrated to, any previously existing data in the destination field (shown in strikethrough), and whatever the new data is that is overwriting it.
If the source field is null in a given case, the destination field will not be overwritten
Confirm migration - This message lets the user know the number of total cases that will be affected by the migration. Once the user clicks "Migrate Data," the background migration process begins
A progress window appears in the bottom right of the screen
A notification appears in the notification center when complete - if any errors occur, a link to an error modal will be included in the notification
An activity feed item will be created in each case where field data is migrated, informing you of the cases and fields affected.
Auto Populate Contact Document Specific Fields
When generating a document using a template that contains contact merge fields, this feature allows you to map those contact merge fields to contact document-specific fields so that they are auto-populated. Populating the metadata fields allows users to generate and manage documents quickly and easily, reducing the time and effort required for manual data entry and improving data accuracy.
How to use it
Add contact merge fields to template
Merge fields are added using the Word add-in (examples: Case.Counsel, Case.Insurance.Adjuster, Case.Parties, Provider.Name, etc.)
Upload the document to Neos templates screen after adding merge fields
Set the document type for the template (the system enables document-specific fields for the template). The following document-specific field types contain contact-specific fields:
Correspondence:
Deposition:
To
Deponent
Court Reporter
Videographer
Experts:
Medical:
Subpoena
The Document Fields Tab within the redesigned template editor menu allows users to select a merge field to map to a Contact Document Field
One or more merge fields can be mapped to a single document field, depending on if the field is a single or mutli-select
Merge fields can be mapped to multiple document fields
If the selected document type's field type does not have any contact fields, a message and link to edit the document type will be displayed
If no document type has been selected for the template, a document type dropdown will allow the user to assign one
User generates a new document and selects the mapped template
User selects values for contact selection prompts in doc gen
Document is generated and the mapped contact document fields are auto-populated with the contacts selected in doc generation
Sync Time and Value
Billable time records and their corresponding value records will be synced (i.e., when a field in one record is updated, the other record updates as well) for more accurate time and value data for billable time entries. Also, new tables for the time and Value tabs have been added.
How to use it
When you create a billable time entry, the corresponding value entry will be synced so updates to either record will be reflected in the other.
Updated value and time tab lists design.
An additional filter for Value code on the Value list has been added.
The “Billed” column has been renamed “Invoiced”
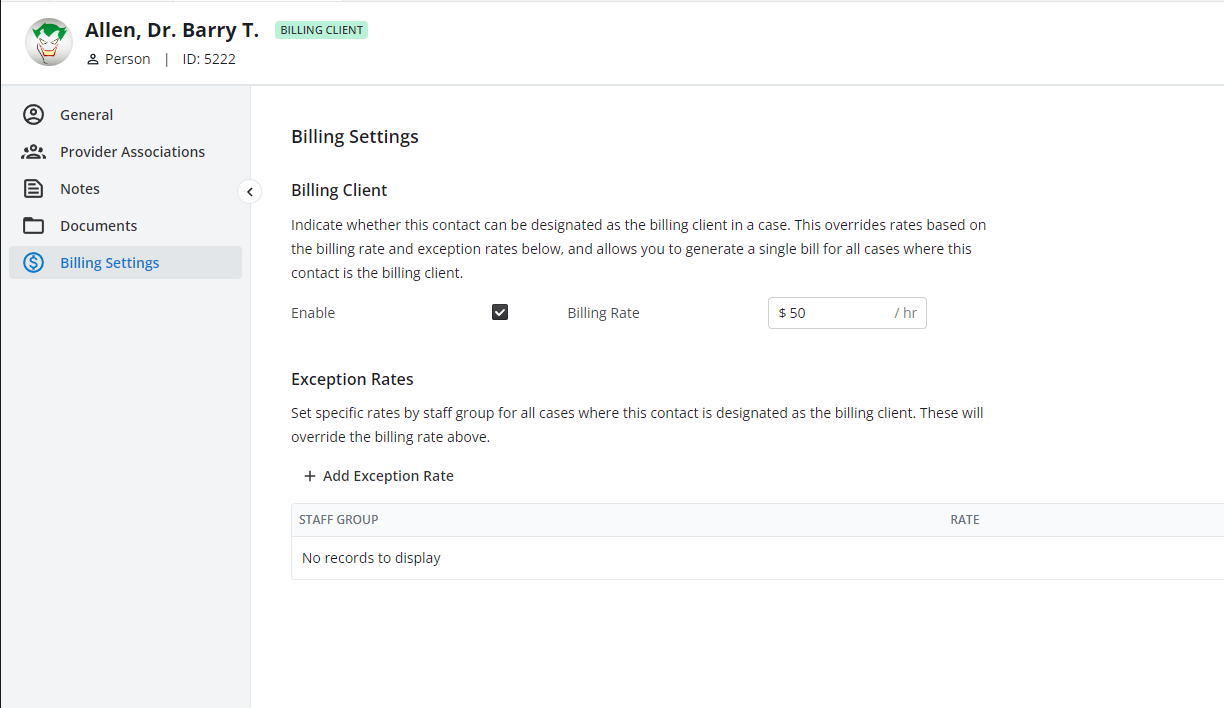
Billing client
New checkbox for a master client has been added on a contact card so you’ll be able to add a master client to a case. Single-select or bulk-select master clients and create invoices for all outstanding value items for selected master clients.
How to use it
Open a contact, click the Billing Settings tab, and enable Billing Client
Set a Billing Rate (this rate will be used for all time entries created in cases where this contact is set as the Billing Client)
Set any staff group exceptions (this will override the Billing Rate for the selected staff group(s)
On a case, a new field has been added called “Billing Client” (this field will list all contacts where Billing Client has been enabled)
Select the Billing Client for the case
When creating a time entry in the case, remember that the rate will be set to the billing client's rate (or exception) and the “Bill To” will be set to the Billing Client
When creating a value item in the case, know that the Bill To will be set to the Billing Client
For cases with no Billing Client set, the rate will work as it did before (based on staff and/or task), and the Bill To for time and value items will be set to the first party in the case
Create Deposit Requests for Debit Transactions on Credit Value Items
You’ll be able to properly record deposits in Neos and deduct payments received from the total amount owed from a provider, resulting in more accurate transactions for deposits and calculations for the amount due.
How to use it
For value items with a Debit Value Code, payment transactions will prompt you to create Check Requests
For value items with a Credit Value Code, payment transactions will prompt you to create Deposit Requests
Open or create a new value item
Add a transaction
Set the amount > 0
Ensure Type = Payment
You will see the Check or Deposit Request toggle (depending on the type of value item)
The toggle will be set to “on” by default
Enhancements
Case Notes Subject Enhancement
Notes on a case will be further subdivided with a free text subject field for quicker search capability, providing the ability to set a subject on general notes and search for notes using the subject.
Close All Tabs
You can now close all your Neos tabs from the carrot located all the way to the right of the tabs bar.
New Integrations
Yocierge
Superior medical records retrieval services with records delivered through a secure, HIPAA-compliant online portal for easy download.
Legal practitioners can now access, review, and share medical records directly within Neos. This streamlines the process of obtaining crucial medical information, saving valuable time and effort.
With faster access to medical records, legal teams can expedite the case lifecycle and generate better outcomes for clients.
The integration facilitates collaboration between legal and medical entities by creating a centralized platform for sharing information securely.
By eliminating the need for manual record retrieval and data entry, legal professionals can reduce administrative overhead, allowing them to focus on their core responsibilities and client representation
Sign up for a demo of YoCierge
Alert Communications
A top-tier answering service catering to legal professionals. Respond to and capture all your leads using best-in-class solutions and processes
Alert Communications screens potential clients based on firm preferences and determines if they’re qualified or need to be referred elsewhere.
Legal intake specialists take leads from initial contact to an e-signed contract, posting directly to Neos.
Learn more about Alert Communications
Dragon Legal Anywhere
Dragon Legal Anywhere brings cutting-edge speech recognition capabilities that allow legal professionals to create documents using their voices. This seamlessly integrated feature has been battle-tested with Neos and adds a new layer of efficiency, enabling users to dictate directly into the platform quickly and accurately.
Dragon's next-generation speech engine ensures high recognition accuracy: you can confidently dictate their documents, regardless of your accent or working environment, leading to accurate transcriptions and improved overall efficiency.
“Anchor focus dictation” allows attorneys and support staff to anchor the text transcription within a specific document, even while working in another window (e.g., referencing a web page).
Try it for free!
LegalSoft
Virtual legal staffing to help you scale without the hassle or commitment of hiring new employees.
Learn more about LegalSoft
Improvements and Updates
Added icons to tabs to indicate the tab type, which is especially helpful when you have a Case and contact open. Both tabs have the same name but now will have different icons.
Improved performance of the Document Generation Wizard
Updates to Neos QuickBooks SDK
Questions?
Contact your customer success manager if you have questions about this release, or sign up for one of our monthly Neos demos for a full product refresh!
For detailed instructions on these enhancements, click the Help icon (question mark) in Neos to access the Self-Serve Portal and Knowledge Base.


