


Legal Tech
NeosAI now auto-assigns SharePoint imports. See what's new in the May Neos release for law firms, including chat upgrades and notification controls.
Legal TechMay 20, 2026
You asked, we built. This release puts NeosAI to work on more of the busywork: auto-assigning SharePoint imports, sharper Chat responses, a new Companion Group in Advanced Search, and customizable email type labels on Contacts, Parties, and Providers. Premium Texting users also get something new: subscribe to a text conversation, choose "Neos and Email," and you'll get an email alert for new texts with a Reply in Neos button.
These updates add up to real time back across your firm.
Don't forget to sign up for the live demo of the top features with our VP of Customer Education, Bryan Billig, during the New in Neos webinar on May 28th at 12 PM ET.
Available April 24, 2026
Smart Document Filing brings document upload, classification, case assignment, and post-filing analysis together in the new File Documents tab. NeosAI can auto-assign type, category, and a matching case, and — when enabled — analyze filed documents to generate summaries and perform extractions by document type. Documents can be uploaded directly or synced from SharePoint, and a firm-wide naming format applies automatically.
Knowledge Base Article: Smart Document Filing with NeosAI
Smart Document Filing reduces the manual effort required to get documents into Neos and filed to the right case. NeosAI assistance cuts the hands-on work of classifying type, category, and case — and when Analyze is enabled, removes the separate step of running summaries and extractions after filing. SharePoint-stored documents come in without duplicate uploads, file names stay consistent without manual renaming, and bulk filing speeds up large-batch processing.
Case Managers & Paralegals — uploading documents, syncing from SharePoint, classifying type and category, and filing into cases through the File Documents tab
Legal Assistants — organizing and processing batches of documents in the File Documents tab
Firm Administrators — assigning the Bulk Filing permission, defining the firm’s document naming format, and configuring the SharePoint integration
Required — applies to firms with NeosAI Platinum. A Firm Administrator must also complete the Admin Setup Checklist below before staff can use the workflow.
Admin Setup Checklist
Before staff can use Smart Document Filing, a Firm Administrator should complete the three steps below.
Bulk Filing Permission
Action Required — A Firm Administrator must review and assign the new Bulk Filing permission under Special Permissions for staff or permission groups.
A special permission named Bulk Filing controls access to the File Documents workflow:
The Bulk Filing special permission, shown on the Staff Permissions page.The Bulk Filing special permission, shown on the Staff Permissions page.
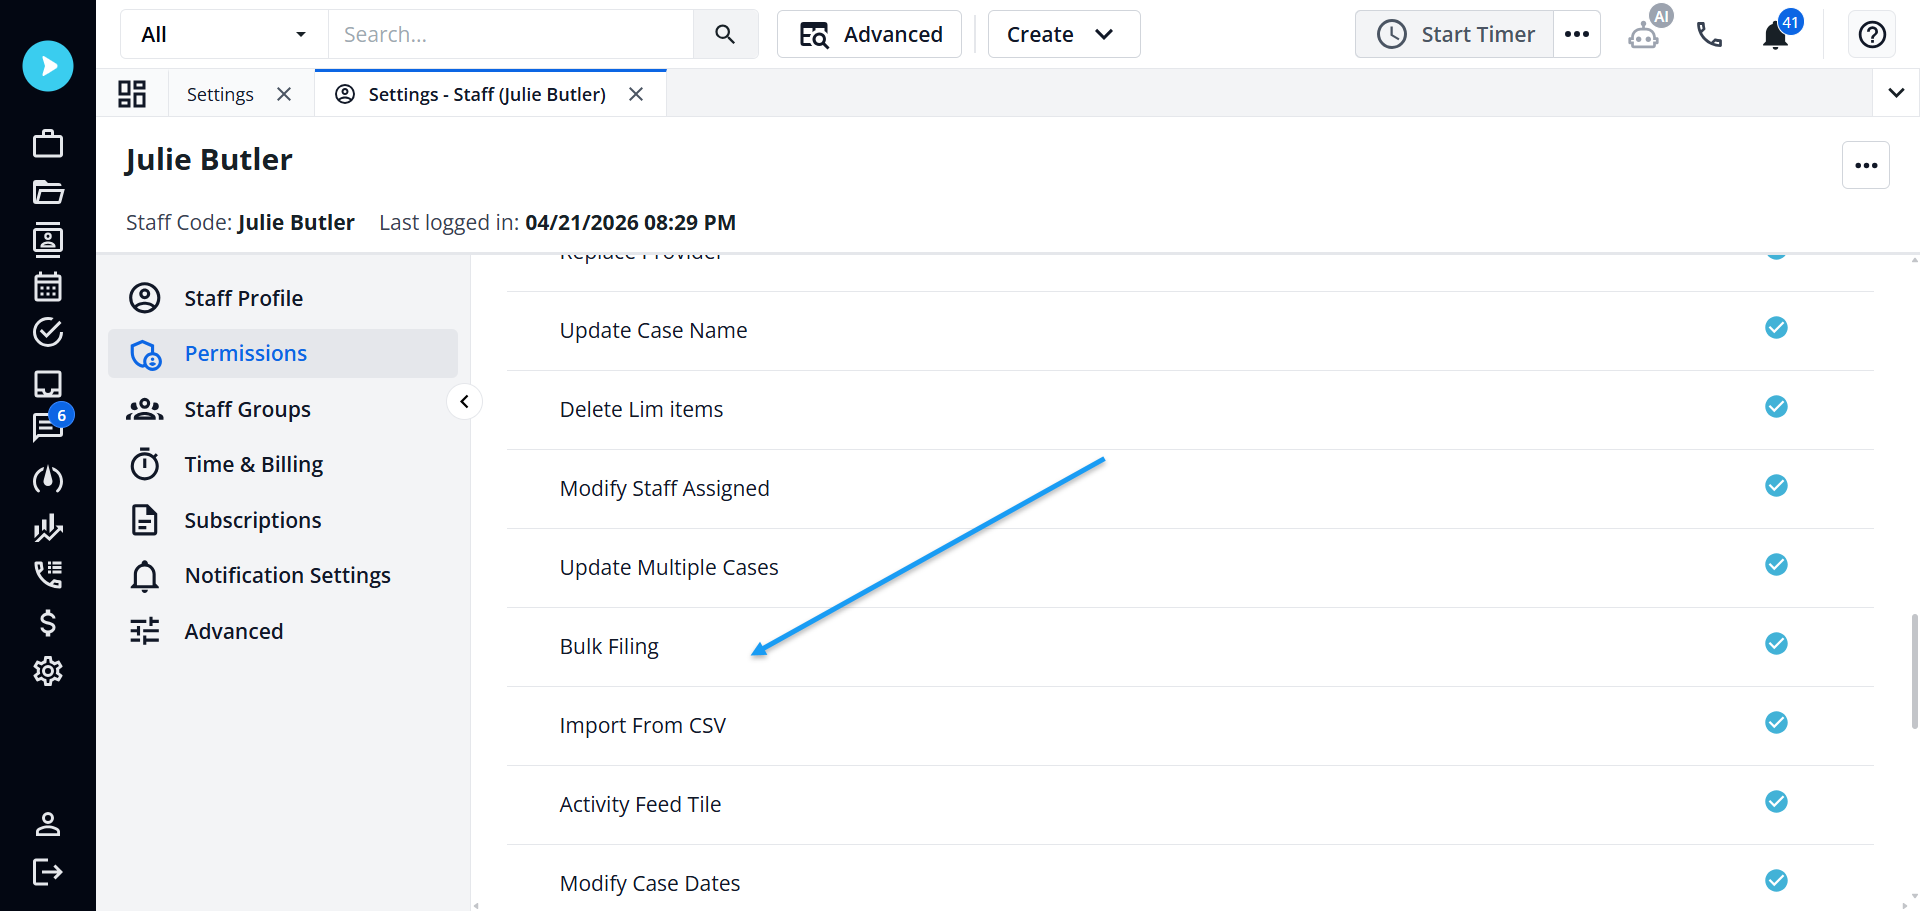
The Bulk Filing special permission, shown on the Staff Permissions page.
Automatic Document Renaming — Setting Up the Naming Format
.png)
Upload Documents
To initiate the Upload workflow:
Drag & drop files onto the Upload modal or browse your files. Documents will be uploaded in the background. When finished, a notification toast will show in the top right and in the bell. Click View Batch in either the Notifications side pane or the progress box in the bottom right of the screen to open the File Documents tab filtered to the newly uploaded files.
To initiate the Upload workflow, use one of three entry points: Top Navigation Bar > Create > Upload Documents, Browse Documents > Upload, or drag & drop files directly onto the Browse Documents grid.
.png)
.png)
.png)
A notification confirms your upload batch is processing. You can continue working while documents upload in the background. When processing completes, a notification appears with a View Batch link to jump directly to your uploaded documents.
.png)
You can also find the completion notification in the Notifications panel with a link to view the batch.
.png)
The File Documents tab displays your uploaded documents.
.png)
SharePoint Sync for File Documents
Action Required — Confirm the SharePoint integration is configured in Firm Preferences before using SharePoint Sync.
Upload files directly to the To Be Filed directory in your SharePoint CaseFiles drive and sync them into the Neos File Documents tab.
Once configured, access the File Documents tab from Create > Unfiled Documents or Browse Documents > Import Unfiled.
After syncing, the documents appear in the grid alongside other unfiled documents. You can then file them into specific cases and categories using the standard workflow.
1. Go to Browse Documents and click the Open in SharePoint button. Upload documents to the To Be Filed directory in your SharePoint Case Files drive.
.png)
.png)
2. Go back to the File Documents tab and click Sync with SharePoint.
.png)
3. Go to Create > Upload Documents, then upload a document. This will be added to your To Be Filed folder in SharePoint.
.png)
.png)
File Documents Tab
To open the File Documents tab, use either entry point:
The File Documents tab lists all unfiled documents currently in Neos.
The File Documents tab displays all unfiled documents with filter options for Batch Number, Author, Document Date, and Date Created.
.png)
Annotated View: File Documents Tab
.png)
.png)
When finished making changes, click Save & File to save your edits and move all assigned documents into their respective cases. Click Discard to close the tab without saving any changes. The Save & File button is enabled only when there are changes to save, or when a document has been auto-assigned to a case and is ready to be filed.
.png)
Editing Documents
Access the File Documents tab from Create > Unfiled Documents or Browse Documents > Import Unfiled.
You can edit document metadata three ways: in the side pane, inline in the grid, or by bulk-editing multiple rows at once.
Side Pane
Access the File Documents tab from Create > Unfiled Documents or Browse Documents > Import Unfiled.
You can edit document metadata three ways: in the side pane, inline in the grid, or by bulk-editing multiple rows at once.
Side Pane
.png)
Inline Editing in the Grid
Click the Pencil Icon or Double-Click a row to make changes. Click the Green Checkbox to commit those changes.
.png)
Bulk Actions
.png)
Resizable Columns
.png)
Automatic Document Renaming — In the File Documents Tab
See also: Before You Start › Automatic Document Renaming — Setting Up the Naming Format for how to configure the firm's naming format. The section below describes how renaming behaves during filing.
When automatic document renaming is enabled, uploaded documents are automatically assigned a proposed file name based on the firm's naming format.
.png)
NeosAI Auto-Assignment Suggestions
If enabled, the content of each document is sent to NeosAI. NeosAI will determine the best type and category from the firm's library and populate these fields on the document.
NeosAI will also list specific case identifiers found in the document and attempt to find a case in Neos that matches. If one is found, it is proposed on the document. If more than one, or none, is found, no case is proposed.
All NeosAI proposals — type, category, and case — remain pending until the user reviews and files the document:
The auto-assignment option remembers your last selection — if you enable it, it will be enabled by default the next time you use it.
After auto-assignment runs, each AI-classified document displays a distinct status icon (group of blue stars) in the File Documents grid. Hover over the icon to see a tooltip indicating the document was classified by NeosAI.
.png)
.png)
2. NeosAI determines the best type and category from your firm's library and populates them on the document. It also searches the document for case identifiers; if exactly one matching case is found in Neos, that case is proposed. If multiple or no matches are found, no case is proposed.
.png)
3. Review for accuracy, make any needed updates, then click Save & File to file the document to its case.
.png)
Analyze with NeosAI After Filing
Access the File Documents tab from Create > Unfiled Documents or Browse Documents > Import Unfiled.
An option at the top allows you to analyze documents with NeosAI after filing. The option retains its last selection per user.
When enabled, documents will be analyzed automatically after the documents are filed into the selected case(s):
Enable the Analyze with NeosAI after Filing option at the top of the File Documents tab. When enabled, filed documents are automatically analyzed: Document Summaries are generated and Document Extractions are performed based on each document's type.
.png)
NeosAI Chat is upgraded across three dimensions in Release 26.03. Two case-aware tools — Get Case Entity and Get Case Contact — are now auto-included in every Chat conversation in case view (no manual setup required), the AI invokes them automatically, and AI responses present case data using human-readable labels aligned to the actual activity types in the case feed. A new animated status indicator displays the tool name and entity being retrieved during generation, replacing the previous minimal "Thinking" state. List-tab data included in Chat (Notes, Values, Counsel, Police, Insurance, Party) is now ordered newest first and respects the same record limits as Case Summary (up to 2,000 records per entity).
Knowledge Base Article: Chat with NeosAI
Removes the manual step of adding case data sources before each Chat conversation, so users can ask case-specific questions immediately. Shows users which tool and entity is being retrieved during generation rather than a generic "Thinking" state. Brings included list-tab data into alignment with Case Summary — newest records first, with the same record coverage — so AI Chat answers reflect current case state rather than the oldest available records.
Case Managers & Paralegals — opening NeosAI Chat in a case and asking questions about case entities, contacts, activity feed records, or included list-tab data
Attorneys — using NeosAI Chat for case review
Required — the NeosAI Chat enhancements in this release apply to staff who have the AI Chat special permission.
Two Case-Aware Tools Auto-Included in NeosAI Chat
Pre-Seeded Case Context
Enhanced Status Indicator
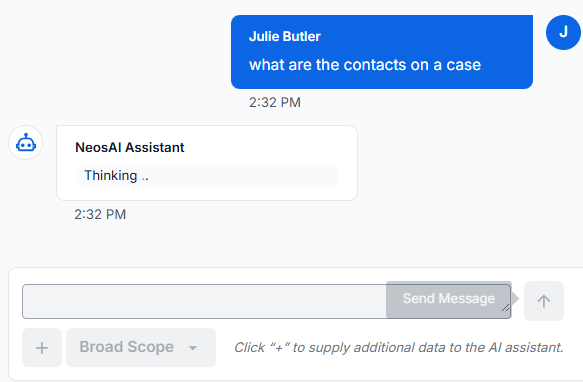 This is an example of one of the new status indicators.
Conversation Persistence
Get Case Entity and Get Case Contact Auto-Included
Reasoning Modes & Context Window
Newest-First List Ordering
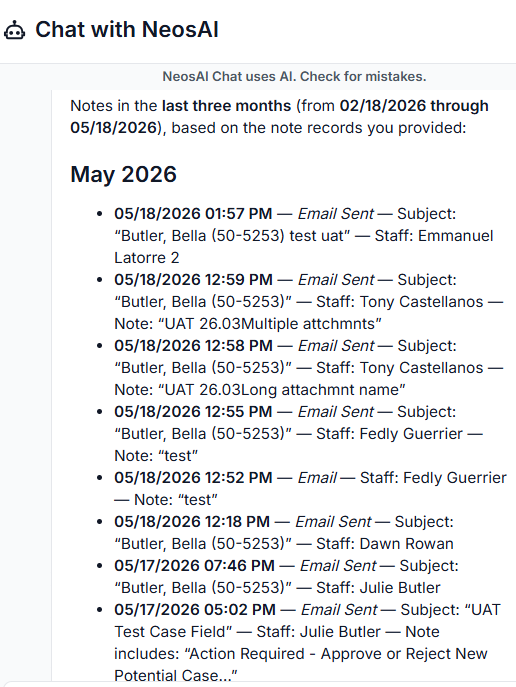 NeosAI Chat response listing notes ordered newest-firstNeosAI Chat response listing notes ordered newest-firstNeosAI Chat response listing notes from a case in newest-first order across the last three months.
Documents imported from SharePoint as unfiled are now auto-assigned with NeosAI in the background, so users no longer need to manually run auto-assign or open the unfiled document grid afterward. The SharePoint import completes immediately and does not wait for auto-assignment to finish; once auto-assign completes, the unfiled document rows update with the AI-suggested values for Type, Category, Case, Date, and File Name.
Knowledge Base Article: Auto-Assign Documents with NeosAI
Removes a manual step from the SharePoint import flow. Reduces the time between a document arriving in SharePoint and being staged for case filing.
Case Managers & Paralegals — importing documents from SharePoint into the unfiled documents queue
Firm Administrators — managing the NeosAI special permission that gates auto-assign
Required — applies to firms with NeosAI Platinum.
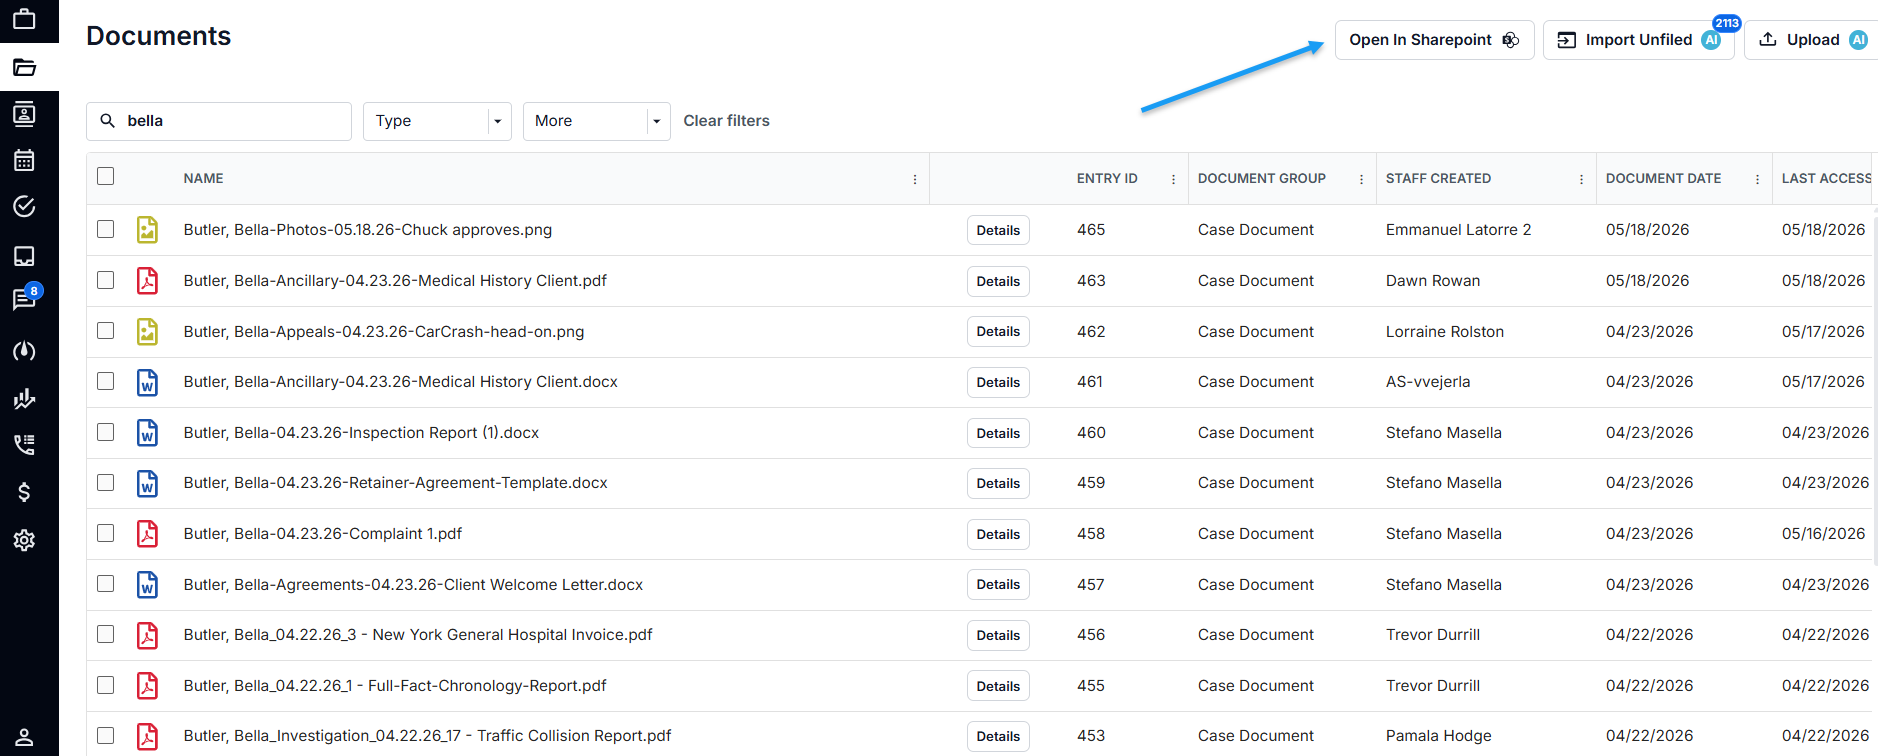
Opening SharePoint.
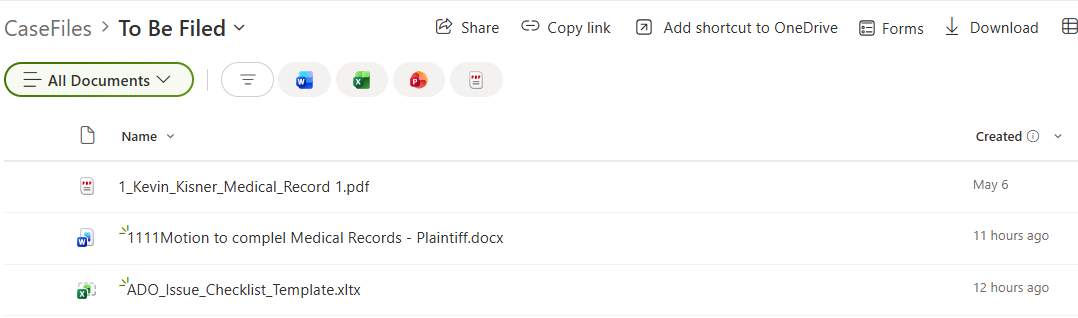
To Be Filed folder in SharePoint.

Syncing with SharePoint.
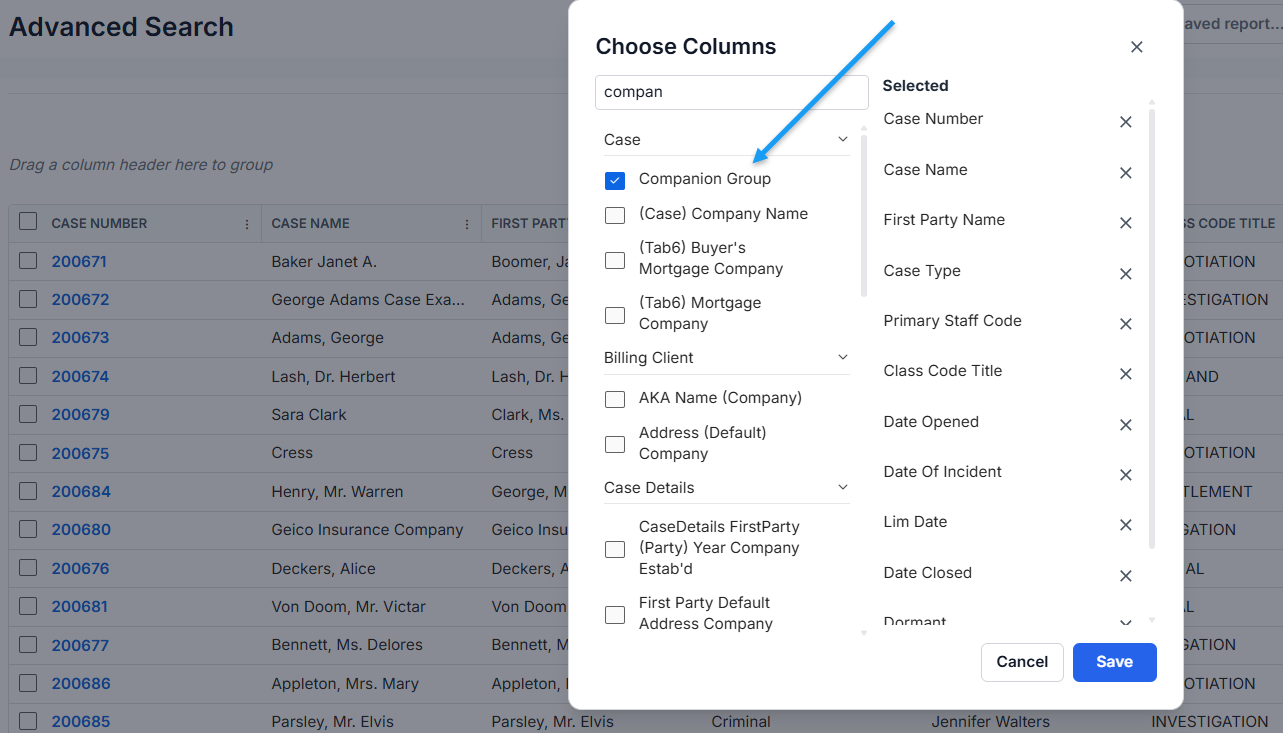
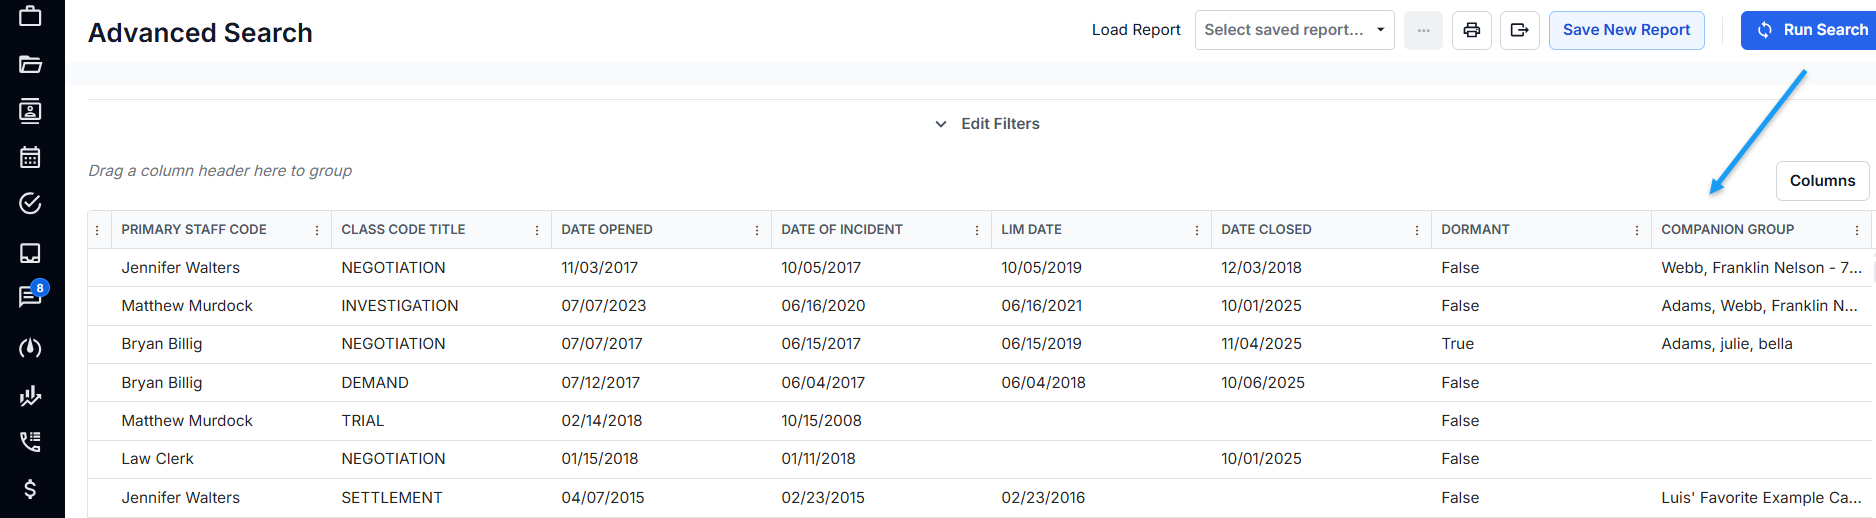
Advanced Search now supports Companion Groups as a column, a filter, and a bulk action across Cases, Intakes, and Intakes-and-Cases. The Companion Group column shows all groups a record belongs to, comma-separated. A new Add to Companion Group bulk action lets users add many selected records to an existing or new Companion Group from search results, using the existing Select Companion Case Groups modal.
Knowledge Base Article: Advanced Search Filter Options – A-C
Knowledge Base Article: Bulk Add Cases to a Companion Group
Removes the one-record-at-a-time bottleneck when organizing large batches of related cases or intakes into Companion Groups. Surfaces Companion Group membership directly in search results so reporting and triage on related cases no longer require opening individual records.
Case Managers & Paralegals — viewing Companion Group membership in Advanced Search results and adding multiple records to a Companion Group via Bulk Actions
Firm Administrators — setting up Companion Groups across cases and intakes
Firm Administrators — gating bulk Companion Group assignment via existing Companion Case Groups permissions
Companion Group as a Column
Advanced Search results with the Companion Group column populated.
Companion Group as a Filter

Companion Group as a filter field in Advanced Search, with the available operators visible.
Bulk Add to Companion Group
Permission required — the Add to Companion Group bulk action only appears when the user has Modify permission for Companion Case Groups.
Bulk Actions > Add to Companion Group opens the Select Companion Case Groups modal.
For firms with Premium Texting, users who are subscribed to a text-message conversation and select Neos and Email now receive an email notification when a new text message arrives, with a Reply in Neos button that opens the conversation thread. Notification preferences in the staff profile also now use a three-option dropdown — None, Neos Only, or Neos and Email — letting users choose how they are notified about activity in Neos.
Knowledge Base Article: Notification Settings Tab
Ensures important text replies are not lost in a long notification list and can be acted on from anywhere — incoming texts reach subscribed users by email, on the go, with one click back into the Neos conversation thread.
Case Managers & Paralegals, Attorneys, Legal Assistants — at firms with Premium Texting, receiving the new email notification (with Reply in Neos button) when subscribed to a text-message conversation and using "Neos and Email"
Named Partners, Attorneys, Case Managers & Paralegals, Legal Assistants, Bookkeepers & Accounting, Intake Specialists, Firm Administrators — adjusting personal notification preferences in the Staff Profile (None / Neos Only / Neos and Email)
Notification Settings Dropdown — All Users
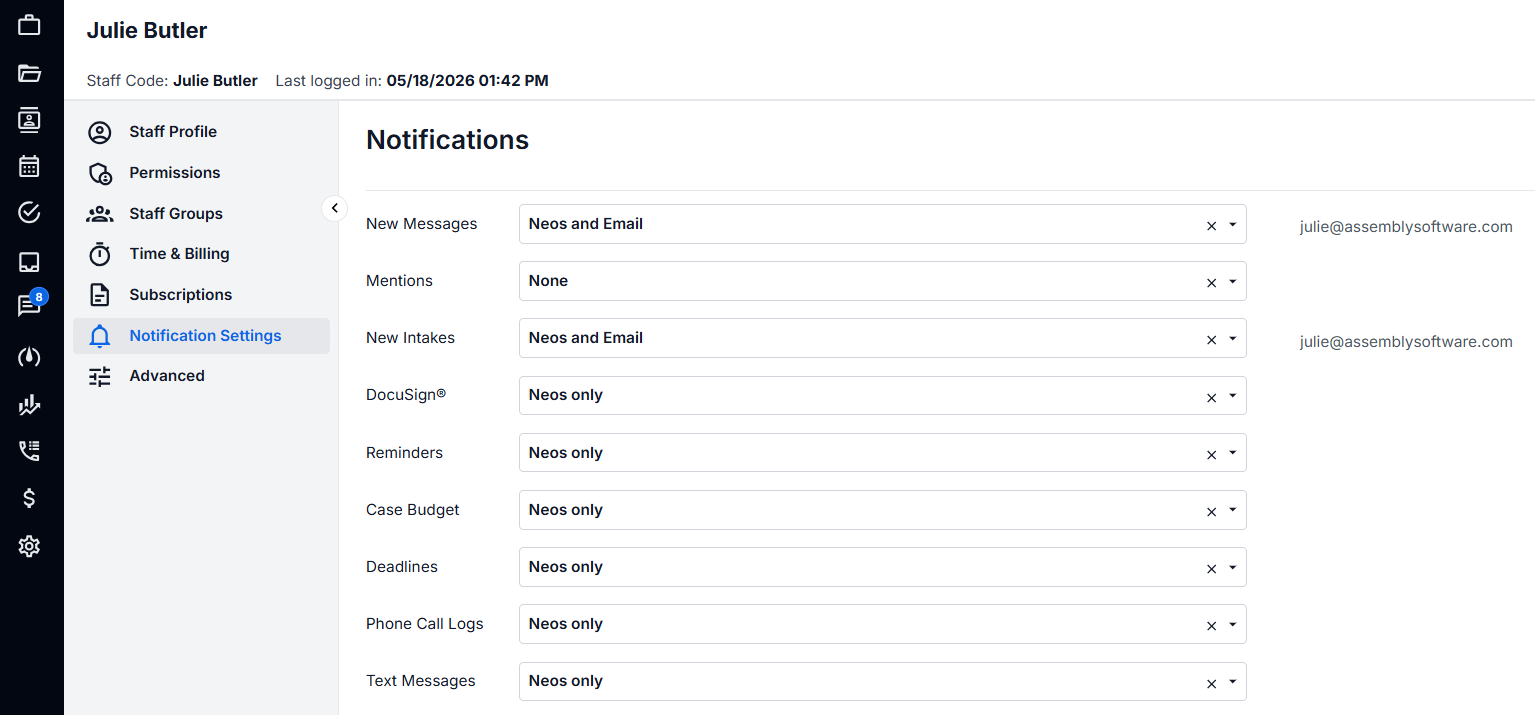
Updated Notification Settings dropdown in the Staff Profile.
Text-Message Email Notification — Premium Texting
Applies only to firms with Premium Texting.
The Email Type field now supports custom values when adding or editing an email on a contact, the case Party Tab, or the Provider Card — matching how Phone Type already works. Users can type a custom label (up to 32 characters) directly in the Email Type dropdown and save it with the email record. The default options — Personal, Business, and Other — remain available, and custom values are scoped to the underlying contact.
Knowledge Base Article: Adding an Email
Knowledge Base Article: Advanced Search Filter Options – D-H
Eliminates the loss of context that comes from forcing every non-default email into "Other." Brings email type behavior into alignment with the existing phone type behavior, removing the need to remember different rules for similar fields.
Legal Assistants — adding and editing email addresses on contacts, case Parties, and Providers during data entry
Case Managers & Paralegals — referencing email type values on contacts, case Parties, and Providers when working cases
Adding a Custom Email Type on a Contact
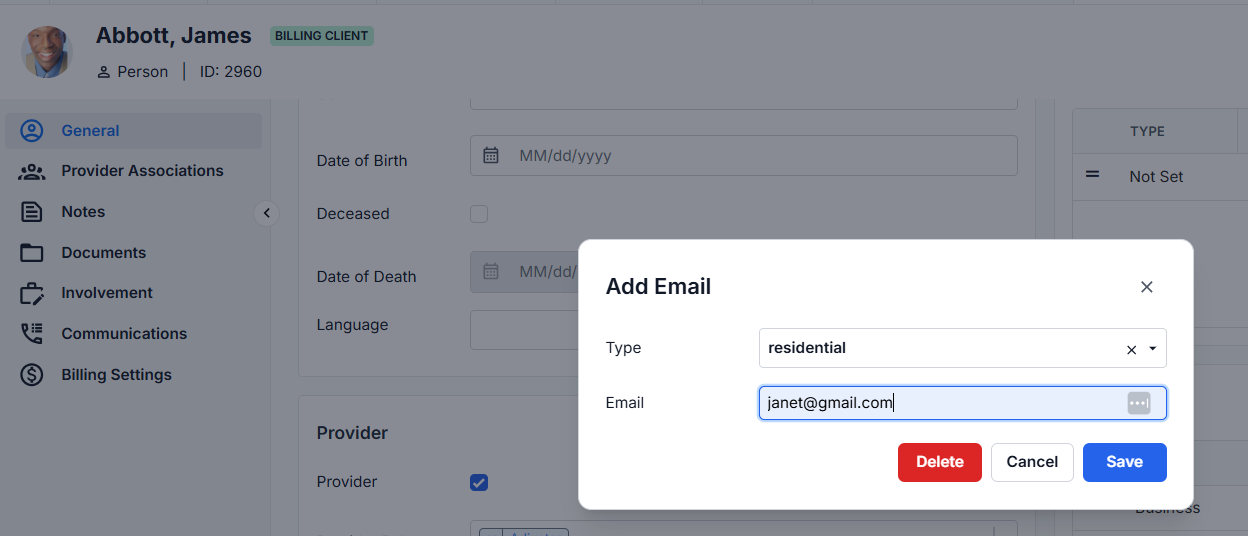
Adding a custom Email Type on a contact — the dropdown accepts free-text values like residential in addition to the defaults.
Adding a Custom Email Type from the Party Tab or Provider Card
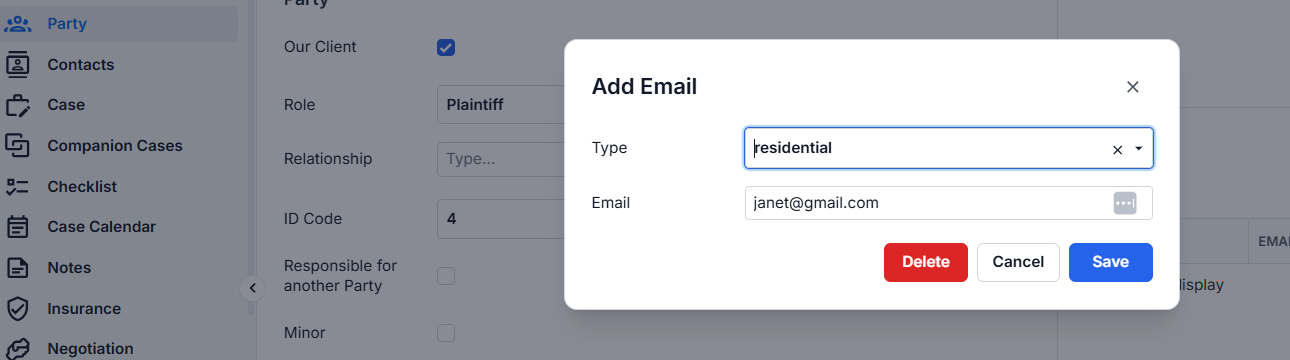
Adding a custom Email Type from a case Party Tab follows the same workflow as on a contact. The same affordance is available on the Provider Card.
Scope of Custom Email Types
Default Email Type in Advanced Search
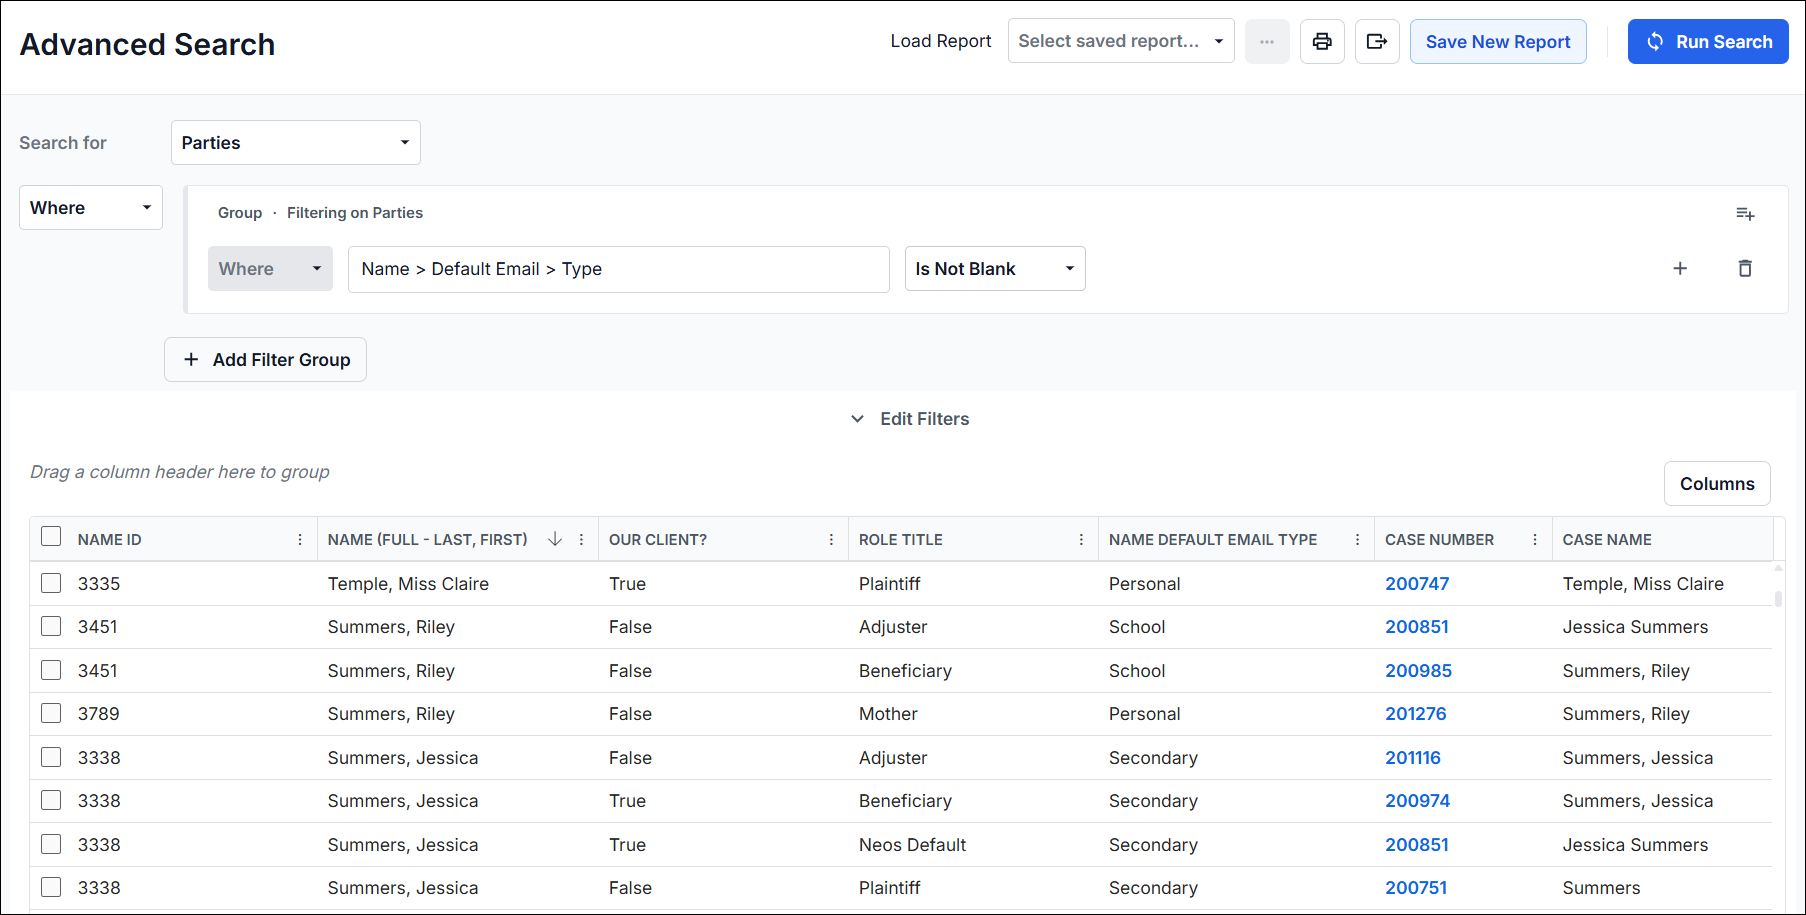
Advanced Search for Parties filtered on Default Email Type — the column shows each party's email type (Personal, School, Secondary, and other custom values) alongside the standard columns.
Bryan will demo all the amazing new features being released this month in real time, cracking jokes along the way.
SHARE
Legal Tech
NeosAI now auto-assigns SharePoint imports. See what's new in the May Neos release for law firms, including chat upgrades and notification controls.
Legal Tech
Check out all the innovative new features and enhancements coming out with March's brand new release!
Legal Tech
Check out all the innovative new features and enhancements coming out with February's brand new release!


